
Tumbling Blocks Part 6

Next we will cut the medium/light strips sets – please note they are a different angle so read and check photos before cutting. Notice the colors are similar but the outside green is lighter than the prior post.  This is my medium strip set.

Here is the photo to make your initial angle on the medium strips.  You will then make your angled cuts.   Notice on photo that the ruler and corner piece is cut from the top this time, not the bottom of the strip.  It matters. 

You will line up the 2.5 inch mark on ruler as with the dark and cut along the far left hand edge of the ruler to create an angle on the top left corner.  Then the angled strips will be cut 2.5 as well, just like the dark.
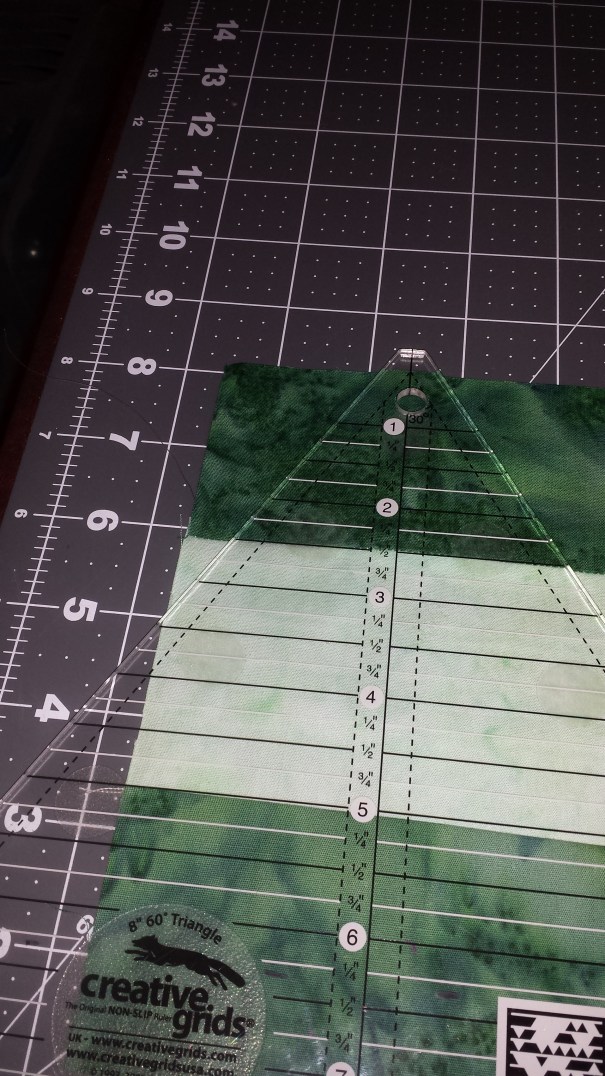
light initial cut

Tumbling Blocks Part 5

We are still working on the dark color strip sets.

Once you’ve cut all your angles pieces we need to cut them into hexagons (or half of your cube).

Place your strips so that the top dark piece angles off to the left.  Place your ruler so that the 4.5 in line is even with your bottom seam as shown in picture.   If your bottom edge of the ruler is touching the edge of the fabric you should be able to cut exactly from one corner of middle fabric to the other.    Make sure your angle matches the bottom and middle photo before you cut.

When you have cut the piece it should look like the top photo.  If so, proceed to cut all dark/light strip sets the same angle.

dark hex finished.  

dark angle cut 2

dark angle cut 1

Tumbling Blocks Part 4

Once you’ve sewn all your strips you can begin cutting your cube shapes from each set of colors.  Please note – my photos are shown left handed. 

Lets start with the dark strips.  You have to make an initial angle so the strips will all come out angled the same direction.  Place the 60 degree ruler downward with the 2.5 inch line along the bottom seam and cut as close to the left edge as possible but not going off the edge. (see bottom photo photo).

Now that you have an angle to work with carefully cut strips measuring 2.5 inches wide – you should be able to get 9 + cuts on each color. (See top photo)

dark hexagon cuts 2


initial cut dark

Tumbling Block Part 3

Once you’ve cut your 7 sets of strips, you’re ready to begin sewing your strip sets.  You will be sewing dark sets and medium sets.

Sew one light strip between 2 dark strips and sew one light strip between 2 medium strips of the same color family.  The light will always be in the middle and will be the same fabric on the dark and medium strip sets.

Below are my purple set and my green set.   Notice both purple strips have the same center fabric as do the green.  This makes the top of your cubes.

Tumbling Block Part 2

You will cut your fabrics as follows:

each light fabric – cut one 3 inch strips the width of fabric  (I used 2 strips to make larger)

each dark fabric – cut two 2.5 inch strips the width of fabric (I used 4 strips but you need a smidge over 1/4 yard)

each medium fabric – cut two 2.5 in strips the width of fabric (I used 4 also but again you need a smidge over 1/4 yard)

Here is a picture of my cut strips using the light, medium and dark purple.  You can cut the strips in half if you prefer to work with shorter lengths.  I found it just made life easier.

cut ctrips

Tumbling Block part 1

You will need:

1/4 yard each of 7 light fabrics  –  1/4 yard each of 7 medium fabrics  – 1/4 yard each of 7 dark fabrics.

To make it more coordinated I picked 7 colors then used a 4th yard of each shade.  For example I used a dark, medium and light blue, dark, medium and light green, etc.  I have used the purple and green colors for my samples.

If you buy a half yard you can make a much larger quilt.  Mine covered the top of my queen mattress prior to the borders using only 4 inches more of each than the quarter yard.


A Tumbling Block Tutorial

I bought the fabrics for the tumbling block quilt and the pattern book well over a year ago and I’ve laid it aside because her instructions were so confusing.  I think most of it was just how she worded things.  After making my initial cuts and nothing lining up, I read thru the entire book and couldn’t believe she gives you so much info after the pattern. When paying $30 for a pattern I don’t expect to read half way thru book “I didn’t bother with left handed instructions, turn book upside down”.  Well how about mentioning that in the beginning before I ruined half my fabric.

My solution – here is a tutorial for the tumbling block quilt for left handed people.   Since blocks post newest to oldest you’ll have to scroll to the first then back up but I’ll number the post.  So here goes with photos and all.


My Custom Made Shifter

It drives me crazy that the shift knob keeps popping off my jeep, especially when you’re turning a corner and slightly occupied doing other things.  Well, I found a guy that can make custom ones with anything you’d like.  So here is my new shift knob.  I absolutely love it.

shift

Quilt Project 2016 #1

2016 is planned as the year to do some quilts I’ve always wanted to try.  I may not get the techniques just right and I may not get them perfect, but I will be able to say I finally did them.  Paper piecing is one on the list.  I’ve tried once and the pieces were not perfect so I need to learn that a little more.  Applique – not a huge fan but I have all the shop hop rows I got from all over the country so at least one of those quilts needs to get finished.  I want to do a french braid with center blocks and before 2016 is over I will have completed a mariners Compass quilt.  I saw one 20+ years ago and it’s what inspired me to begin quilting.  I thought it would be amazing to make something like that.  20+ years later and I’ve never made one.  So 2016 is new horizons and new techniques and I WILL learn to free motion quilt feathers.  I’m also hoping to teach a few new people how to quilt.

This is the block I’m currently working on just as kind of a fill in project.  Once I quilt a bargello for a friend and make a t-shirt quilt for a customer I will start on projects for 2016.   This is coming out pretty and I’ll probably post if for sale.  Wish you tell from picture the pinwheel is 3-d.

block